


Local Servers are so important to developers because it allows you to try your project without having to deal with the INTERNET directly more especially if getting INTERNET access is not something easy in your location. for that it is best you prepare your system down and ready on your local Server being it WAMP, XAMPP or any other Server that serves you locally with ease.
Then after your Good and Hard work you would like the world to benefit from your property by hosting your entire idea on a live working server Online, and is not actually a bad idea because doing that is not difficult at all but require a little bit of discipline and technicalities.
In WordPress many plugin could be used to to acheive those task require to transfer your local site, BackupBuddy is one of them and we can also talk of another one Duplicator which also proves to be very efficient
So let’s say you have your wordpress installed and Fully developed to the level you want your users to begin having access to
the first thing you need to do is to download and install an FTP File Transfer Protocol Software of your choice but in this tutorial I am going to recommend you to FileZilla which is so easy to use when it comes to transfering your files to an online server.
The second Next thing you need to get ready is you hosting environment where you will host your live site ,
You can check around here if you don’t have one.
Now let’s look at the steps involve in our whole process.
As described earlier above we going to use FileZilla to upload our local WordPress site to the hosted environment online and to do that just login into your Cpanel from the FileZilla with your username and Password and begin to upload your local files to any directory of your choice into a folder in your public_html directory.

Now that we are sure our files are all in place on the server we need to get our local database file ready to be imported to the local server and it is very simple to do that in the phpmyadmin environment.

the video below can also help you understand how this whole process of Export and Imports Works
https://www.youtube.com/watch?v=ZrbQ5nnoJoE
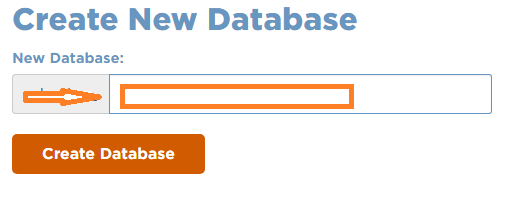
The FTP Transfer may take a while so in the mean time if your upload has not finished yet let’s move on the kill the time by creating a creating a database on our Online Server in order to transfer the Exported database to it.
In your Hosting cpanel you need to create your database and in my case am using a Hotsgator Cpanel so here we go with the image below.
Next you try to create your preferred database
After creating the database you need to setup a user for your database just like the way it is done in your local wordpress invironment and you do not forget to grant all privileges access to the created user or if you have control over your database you can decide who can access what, but if you cannot control any of these then kindly make access granted for all privileges instead below after creating the user.

Now that we are sure our files are all in place on our server we need to import the exported database from the above steps into our newly created database.
in your phpmyadmin of your Cpanel just select your database and click on the Import tab label in red in the picture below

The next is to move to the directory where your Exported SQL database file has been kept and select it to be uploaded onto the server, the image below

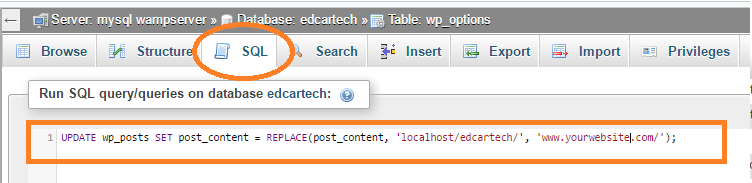
Almost there now you need to set or change the url site name of the local site to a that of the new online website name, to access where this is done you need to look on the database tables on locate wp_options

then you browse to where the data in the table can be changed and manually change http://localhost/edcartech/ to the name of your live site for instance www.yourwebsite.com/
Now that we have imported the database, and all of our content should be uploaded, it is time to configure WordPress. At this time, your site should be showing an Error Establishing Database Connection error. To fix this, connect to your website using an FTP client and edit wp-config.php file. Provide the database name, user and password you created earlier. Save the wp-config.php file and upload it back to your server. Visit your website, and it should be live now.
Login to your WordPress admin panel, and go to Settings » General. Click save Options. This will ensure that the site url is corrected anywhere else that needs to be.
Then go to Settings » Permalink and click Save to ensure that all post links are working fine.
Once done with the steps above you should be able to at least have access to the first Home page of your live site. If you have images and links that involved the paths of your local server then they will all be saved in some tables of your database, so we are going to fix all that by a simple update Query that will be executed in your phpmyadmin after clicking on the SQL tab.
The Code below can be copied and pasted in the SQL tab as described in the image below the code.
|
1 |
UPDATE wp_posts SET post_content = REPLACE(post_content, 'localhost/edcartech/', 'www.yourwebsite.com/'); |
Congratulations you now have your site fully uploaded online and now visitors can take advange of your master mind.
Please if you have anything in relation to this tutorials kindly comment below. Thank you.


Leave a comment